Monocot & Dicot Kit*
Categories: Kits , Spanish , Plants , Science
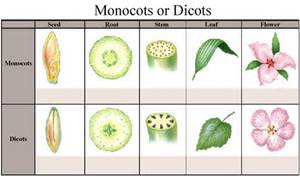
In this lesson students set up a side-by-side germination experiment of monocot and dicot seeds. They will observe differences and similarities of these two types of flowering plants at the germination level, specifically the number of cotyledons. Students can record their findings daily. This is a great way to begin a flowering plant unit
1) Begin the lesson by providing students with a brief discussion on the two types of flowering plants – monocots and dicots – and how at their most basic, the difference is the number of cotyledons they have. Use the student fact and observation sheet attached to help explain a cotyledon.
2) Break students into pairs and provide each group with a bag, seeds and three cotton balls.
3) Students moisten the cotton balls with water until they are wet, but not dripping.
4) Students then put the seeds on a cotton ball and place it in the bag. Note: Each type of seeds are on a separate cotton ball. Don’t mix them. When they are all done, students seal the bag so moisture won’t escape. Using a sharpie marker they write the first letter of each seed type on the bag to help them track their observations.
5) Students record the seeds’ germination process and try and determine which of the seeds are monocots and dicots, and how they can tell the difference.
For full instructions, please download our PDF