•6 Invention cards*
•10 craft sticks*
•8 binder clips*
•6 clothespins*
•5 objects (i.e. tape dispenser, water bottle, stapler, etc.)
Categories: Kits , Literacy , Social Studies , Spanish , Science
Back in the 1830s, a young blacksmith from Vermont, made his mark on American history. John Deere, That’s Who! is the story of John Deere and his development of the steel plow. Beautiful illustrations accompany the fun text and bring the story of this remarkable innovator to life.
Directions: for full instructions, please download our pdf.
Part I: Agricultural Inventions Timeline
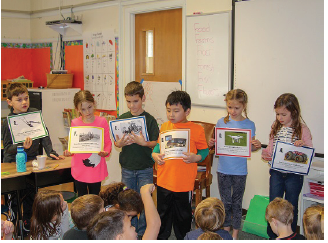
1) Show students each of the 6 inventions cards reading each caption aloud and placing it on the board.
2) Divide students into five groups. Have each group discuss where each card should be placed in a timeline of agricultural inventions starting with the oldest. Go around the room and have students share what sequence the group place each invention in.
3)Review the correct order of inventions (C, F, E, B, D, A) with students and discuss challenges or problems these inventions helped solve and their contribution to sustainability.
Part II: Students as Inventors (STEM Activity)
1)Provide students with the context that when farmers drive their tractors over soil it compacts which reduces the air and water in the soil. Today, your challenge is to see if you can help these farmers out! Your goal is to build a structure to support the weight of an object they choose using the least amount of surface area possible (least amount of points touching the table). This represents spreading the weight of equipment used in agriculture over a broad area to reduce compacting the soil.
2) Provide each group with a set of Building Materials (10 craft sticks, 8 binder clips and 6 clothes pins) and an object and give them 7-10 minutes to build a structure.
3)Have each group present their support structure to the class and test it by placing the assigned object on the structure.
4)When the activity is complete, have students dismantle their structure and place the materials back in their bag.
5)Discuss the following questions:
a. How did this activity relate to agriculture?
b. What techniques did you use to build your structure? How did you decide?
c. How many points touched the table?
d. Did your structure hold the object? Why or why not?
e. How could you improve your structure?