Categories: Easy Do-at-Home Activity , Spanish , Animals , Plants , Science
This lesson is a fun and tasty way to introduce students to dichotomous keys and how to create their own keys using snack packs of nuts, dried fruit, or chips. Non-food items like pens/pencils work well, and avoid allergens.
Use this virtual version featuring mint candies to learn about dichotomous keys.
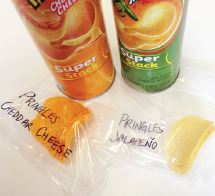
In this lesson, snacks are the objects students are trying to categorize and identify. The lesson begins with the class creating one key together, then breaking into smaller groups to make their own keys. Students then share the keys they create with the class. There can be many correct versions of a dichotomous key for the same population. For this lesson use about six to eight different types of something: variety packs of snacks or dried fruit are suggested, but you can use non-food items; a set of pens and pencils for example, or other groups of items you may have in your classroom. Place samples of each item into plastic bags, and label them with their specific brand and/or flavor/color. Make one set of items for each group. For a class of 30 you will need about six sets of items.
1) Begin with a brief background lecture on what a dichotomous key is, how it is used and give examples of where and why they are used.
2) Divide students in groups based on the amount of snacks you have, each student group should receive 6-8 bags of different snacks.
3) As a group, go through how to make a dichotomous key using the example on their worksheet. Place all the items in their original packaging where students can see them.
For younger grades: Brainstorm with the class on how they could divide them into two distinct groups. (i.e., type, flavor, color, packaging, shape, etc.) Write the possible
distinctions on the board. Next, walk students through an example. The example provided is based on packaging distinction for chips – Tube vs. Bag Packaging. For each
dividing distinction, there should only be two options. Keep dividing and recording the distinctions on the board until you have classified each type of snack.
For older groups: have students brainstorm within their groups to determine distinctions between snacks.
4) Have the groups share and test their keys with the class. If using snacks, let students eat and enjoy their “classified” snacks after the lesson.