Categories: Easy Do-at-Home Activity , Math , Introduction to Agriculture , Spanish
This lesson introduces plant needs and the basic principles of garden design. Square foot gardening is a method of food production that allows gardeners to grow a large amount of food in a small space. Gardens are divided into a square foot grid, with every individual square measuring 1ft by 1ft. The size of the plants at maturity will determine how many of each plant type can fit into a single square. This method requires students to use their math and measurement skills to design a garden that fits the uniquely sized beds at their school. This lesson can be used to emphasize fraction practice for older students and simple units of measurement and counting for younger students.
This lesson was adapted from the Junior Master Gardener Learn, Grow, Eat, and Go! Curriculum. You can purchase that here: https://jmgkids.us/lgeg/
Part I: Create a square foot grid in your garden
1) Using a measuring tape, determine the length and width of your garden. If your garden bed does not divide evenly into a square foot grid, limit the grid to a section of the garden that can be evenly divided into square foot sections.
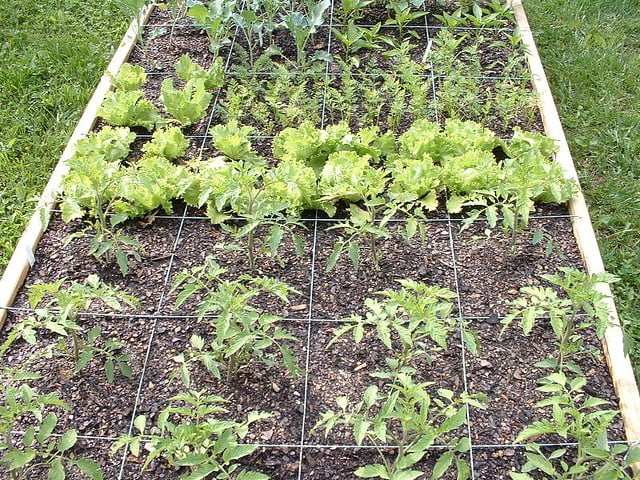
2) Mark every foot along the perimeter of the garden with a dowel. Connect parallel dowels using twine. This can be most easily done by tying the twine to each dowel, however twine can also be nailed into the raised bed at 1’ intervals. The result of either method will be a grid made up of square foot units.
Part II: Selecting Plants for your Square Foot Garden
1) Select at least one seasonal example of an extra-small, small, medium, and large plant. Refer to the plant list included at the end of this lesson plan for guidance. Students can determine for themselves which plants to grow, or you can decide for them in advance. In fall, we recommend planting a mix of radishes (extra-small), beets (small), lettuce (medium) and broccoli (large). In spring, we recommend planting a mix of carrots (extra-small), sugar snap peas (small), swiss chard (medium) and tomatoes (large).
Part III: Planting your Square Foot Garden
1) Review plant needs with students. Plants need PLANT: Place, Light, Air, Nutrients, and Thirst (water). Make sure students know that gardens facing the south get the most sun. As a result, it is important to make sure that your tall plants are on the north side of your plot, so that they don’t cast shade on the shorter plants.
2) Introduce students to the concept of square foot gardening. What are some of the pros of this system? What are some of the cons? What resources do square foot gardeners use when planning their gardens?
3) Each student will be given as 12’’ x 12’’ paper towels to plant their seeds. They will need to glue seeds to the paper towel at the appropriate spacing for their selected plant. Model the process using carrot seeds. Ask students how they might evenly space 16 carrot seeds on a single paper towel.
4) Model folding the paper towel into 16ths, naming the fractions that are a part of the process (two halves, four quarters, eight eights, sixteen sixteenths).
5) Have students write their name and plant (or multiple plants if they can fit multiple on their sheet) on their paper towel, as well as the planting depth. Planting depth information can be found on the back of each seed packet, or in a gardening reference guide. Instruct students to glue their assigned seeds to the center of each square on the paper towel. These seeds do not need to be removed from the paper towel, as the paper towel is biodegradable and can be planted in its entirety. If students will be transplanting, they can simply mark with permanent marker where the transplant will go in the square. In addition to writing the planting depth on the paper towel students should record information in the Square Foot Gardening Guide sheet.
6) Have students label what they have planted and the planting date on a popsicle stick.
7) Go outside and have students plant their paper towel squares in the square foot garden grid that you created prior to teaching the lesson. One paper towel should fit in each square foot cell. Cover the paper towels with a thin layer of soil and gently water.
8) Have students create a map of the garden, recording what is planted in each square. Use the Garden Grid template activity page. Encourage creative yet accurate illustrations!